DIY projector. Making a projector using a mobile phone. An option on how to make a projector from a phone with your own hands
A small projector can be assembled from a box and a monitor at home. Of course, it cannot be compared with factory and “store” models. But it will be able to project a high-quality picture on a large screen. This is suitable for personal use. To create a home theater, you don't need special skills, knowledge or professional help. Although you will need some parts, a smartphone and the ability to cut out cardboard. Read how to make a projector with your own hands and you will understand that it is very simple.
To build a complete multimedia equipment from scratch, you need electronic parts for the display. If you don't want to solder the boards and assemble the LCD screen, prepare your smartphone, tablet, or small wireless monitor in advance. The device will be inside the “case” during viewing. And if you make a projector with your own hands from a phone that you use often, you will not be able to answer calls. To do this you will have to interrupt playback.
In addition to the display, you will need:
- Magnifier. Preferably 10x magnification. This should be a quality magnifying glass, not a cheap trinket. The quality of the projected image depends on it. Take a large magnifying glass. The best option is a Fresnel lens.

- Cardboard box with lid. To assemble a homemade projector from a smartphone, you can use other materials. The main thing is that you are able to cut it. And so that it does not have a mirror surface. The box must fit your phone (tablet or monitor) freely. Also keep in mind that there will be a magnifying glass on her side. Estimate the dimensions by eye so that everything fits exactly. The body can be glued together by hand from pieces of cardboard.
- Scissors and/or knife.
- A holder or stand for a smartphone should fit into a homemade projector. To fix the screen in one position.
- Pencil.
- Compass.
- Scotch tape and/or glue.
You can also do a simple thing to view slides. It requires:
- Flashlight or bright lamp.
- Magnifier. Not very convex.
- Mounts or stands on which all this can be placed.
- An optional tool is a holder for transparencies.
Slide projector

Slide projector
Here's how to make a projector yourself if you plan to view slides on it:
- Place a flashlight or lamp next to the screen (a white wall or sheet will do). Don't move it too close. A distance of about two meters is optimal.
- Attach a magnifying glass between the screen and the flashlight. So that light falls on the wall through it.
- If you place a slide between the lens and the lamp, you will see a magnified projection.
- You can create a single design from this. Attach a magnifying glass, slide holder, and flashlight to each other.
- To change the size and clarity of the image, move your homemade diascope.
It is only suitable for static images. This is not a projector from a smartphone on which you can. But if you still have old filmstrips, they will not be lost. This product is suitable for playing with children. You will show them interesting drawings and at the same time demonstrate the basic laws of optics.
Telephone

To make a cardboard projector for a smartphone, you need a phone with a good and bright display.
- Make a hole for the lens. Place it on the side of the box and trace it with a pencil.
- The hole should be slightly smaller than the magnifying glass. Using a compass, mark its contours inside the already drawn circle.
- Cut out the hole.
- Make a small hole for charger. When watching a video, your smartphone battery can drain very quickly. It's better to connect it to the network.
- In order for the magnifying glass to enlarge the image from your phone, select the correct position in advance.
- Place it on the hole in the cardboard.
- And place the included smartphone in the box itself.
- Point its screen towards the lens.
- Move it back and forth. Stop when you get it best quality pictures.
- Mark the place where the phone will stand.
- Glue the magnifying glass to the hole using tape.
- Place a holder or stand for the device in the box so that it is fixed in one position. The light from the display should hit the lens directly.
- Put your phone there.
- Close the box lid.
To make a projector for your smartphone with your own hands, you don’t need much. If the result is no picture at all, then the magnifying glass is not suitable. To calibrate the image, move the phone inside the box. It makes sense to set it up. Increase brightness. Change the settings for automatic dimming and turning off the screen.
Laptop
Here's how to make a projector for your laptop or tablet out of the box:

- An ordinary magnifying glass will not work. You need a Fresnel lens made of liquid plastic. Size - depends on the box. The optimal size is 200 by 250 millimeters.
- There should be a distance of about 50 centimeters between the screen and the magnifying glass. Take a look at the corresponding “body”.
- Cut a hole in it for the monitor.
- There will be a lens on the opposite side. Attach it to the cardboard and circle it.
- The hole for the magnifying glass should be slightly smaller than the drawn outline. So create a second stroke inside the first one.
- Now cut out the hole.
- Attach the lens to it using tape. From the inside of the box.
- The magnifying glass should be turned with its corrugated surface towards the monitor.
- Now attach the display itself.
- If it's a tablet, lock it in the "straight" position. Lean it against a vertical support. Or attach it to a stack of books.
- If you have a laptop, just place it on a table or floor and place the projector blank on top.
- The Fresnel lens reverses the image.
- Before you finally fix everything, check whether the picture is projected on the wall.
- Set the brightness to maximum.
- Disable sleep mode on your laptop or display dimming on your tablet.
Now you know how to make a projector with your own hands from a box and a phone. And you can create a personal cinema room in a few minutes. The main thing is to find a suitable magnifying glass.
Tell me, have you ever collected useful things from scrap materials?
Many people like to watch movies. Fortunately, nowadays there is a lot of suitable equipment: from smartphones and tablets to large plasma and LCD TVs. But what to do if there is no large plasma nearby, but there is a large group of people eager to watch another good movie? That's right, make a projector. You can read about how to make it yourself in our article.
Everything you need
If we are making a projector for a smartphone, then we will need: an ordinary cardboard box (for example, a shoe box), a large lens that can be safely pulled out of a magnifying glass, a small amount of cardboard, tape and glue.
The projector box will block light from outside, preventing refraction and scattering of the smartphone image. The lens in this project acts as a lens. When properly configured, it will begin to focus the light and transfer the image to the surface.
Of course, such a simple device will not turn out perfect, with a clear and high-quality image, but you will be able to study the primitive structure of the projector and enjoy watching a movie in the company of loved ones, and this is the most important thing.
Making a projector
First we need to ensure a good “camera” image. Using black paint or paper of the same color, we ensure that the inside surface of our box is matte black. Thus, we will significantly reduce the reflection of light from the walls of the box and improve image quality.
Then we make a slot in the end of the projector box that matches the diameter of the lens. This is necessary for good fixation of the lens and the absence of gaps, i.e. extraneous light that would definitely interfere with our viewing.

Next we move on to the lens and smartphone. There are at least two ways, which we will tell you about. They differ fundamentally based on the composition of the moving elements. In the first option, we will move the lens to focus correctly and increase image clarity. In the second option, we will move the smartphone for the same purpose.
- If you decide to make a movable lens, then you need to make a cardboard cylinder whose diameter matches the diameter of the lens, then use glue applied to the end of the lens to secure it to the base of the cardboard cylinder. The length of this design should not be very large; it is enough that it provides a lens travel of 5-7 centimeters. The smartphone is fixed in one place and does not move anywhere.
- Here the smartphone acts as a moving element. In this case, we need to make a stable platform for the phone (from foam, cardboard or even a paper clip), which we will move around the box, thereby achieving maximum image accuracy. The lens in this version is fixed at the end of the box and serves as a static element for focusing the smartphone’s light code.

Final preparations
After installing the entire structure, our preparations are almost complete. But it’s worth paying attention to a few nuances:
-
Inverted image
The image from the smartphone, passing through the lens, turns out upside down. Naturally, watching a video in this format will not suit anyone. The most in a simple way in this case, it will flip the original image 180 degrees. In this case, you will get a normal picture at the output. -
Image clarity
You need to achieve maximum image clarity. This is achieved by manipulating the lens in the first case, using a homemade lens, and moving the smartphone along the walls of the box in the second case. When maximum image clarity is achieved, you can consider the setup complete. -
Surface preparation
It is advisable to prepare a wall, table or other surface on which films and other images will be broadcast. Ideally, it should be white, smooth and matte. For our little experiment, you can hang a regular sheet or take large thick white paper. -
Preparing the room
The room should be dark. Then, and only then, your image will be as clearly visible as possible, and you will enjoy viewing. If your private viewing takes place in the evening, it will be enough to turn off the lights in the room. Well, if the action takes place during the day, you can close the curtains tightly and try to minimize the flow of light into the room with the projector. Don’t forget to increase the brightness of your broadcast smartphone to maximum - this will ensure the clearest and most colorful image.

Enjoy watching!
That's it, now the entire process of assembling and preparing the projector is complete. All that remains is to choose your favorite movie, get together with a friendly group and enjoy the movie. Let the movie show bring you a lot of joy, and let the assembly of a simple device from a shoe box go quickly and efficiently.
For additional information on assembling your own projector, we suggest you watch the following video:
Take it for yourself and tell your friends!
Read also on our website.
A projector is an important part of a home theater. Unlike a TV, it is compact in size and does not take up much space. This allows you to take it with you to presentations, parties and much more. But the projector is unreasonably expensive, and not every person can buy it. Therefore, the idea of making a projector with your own hands is not without meaning and has the right to life.
Design and principle of operation
There are several types of projectors in the world. Of these, there are two main ones, which are the most common. These are projectors using cathode ray tubes and a liquid crystal matrix.
CRT projectors have many disadvantages that LCD projectors do not have.. This is a lot of weight, the brightness is no more than 300 lumens versus 10 thousand for liquid crystal and bad quality images. Therefore, now they can only be found in a museum. They were replaced by LCD projectors. These projectors are similar in operating principle to those in which the image source was a film strip. Now a liquid crystal matrix is used instead.
An LCD projector consists of several basic elements:
- Control boards;
- Light source in the form of a lamp or LED;
- 2 Fresnel lenses;
- Liquid crystal matrix;
- Lens.

The light leaving the LED hits the Fresnel lens, which scatters it. Scattered light is evenly distributed over the entire surface of the matrix and passes through it. Passing the matrix, the light takes on the colors of the frame that was on the matrix during its passage. After the matrix, the light hits the second Fresnel lens, which is turned on the other side. The lens collects light into a beam and sends it to the lens. The lens focuses the light so that the picture is clear and has no blur at the edges.
The lens is also used to change the focal length. This is needed to set up the projector when you move it to a new location.
DIY making
A good projector will cost you a considerable amount, so it’s worth thinking about how to make one for your phone yourself.
This projector is easily assembled from scrap materials. Here is a list of what you need:
- Hot glue gun;
- Elongated rectangular box;
- Magnifying glass;
- Black marker or paint;
- Stationery knife.
If you have collected everything you need, then you can start making a projector from your smartphone with your own hands.
Paint the inside of the box and lid black to prevent light from reflecting off the walls and interfering with the operation of the device. Wait for the paint to dry and begin cutting out the hole for the lens.
Remember that the magnifying glass is the key element of the projector. The quality of the picture directly depends on it. Never buy cheap glasses with plastic lenses. Glass lenses from 10x magnifiers are ideal. If you have a Soviet magnifying glass lying around at home, use it. If you don’t know which box to use, take one from under your shoes, it has the right size. Attach a magnifying glass to the end of the box and circle it with a marker. Use a utility knife to cut a hole along the outline and install a magnifying glass there.
 There are only two options for installing a magnifying glass: Place the entire magnifying glass or remove the lens from it and install only that. Choose the option that is convenient for you and install the glass.
Plug in the gun and wait until the glue in it melts. Be careful when working with a glue gun. The glue in it is heated to 130 °C and causes deep burns if it comes into contact with the skin. Place the lens on the hole and apply a little hot glue on different sides. Align the lens with the body and hold until the glue hardens. Take a gun and seal the remaining cracks with glue. Once cured, carefully cut off excess glue from the lens.
Place your phone in the box. You need to place it sideways, with the screen facing the lens. Set the brightness on your phone to maximum and play a video. Turn off the lights in the room and point the lens at the box at the wall. A fuzzy image will appear on the wall. By bringing your phone closer or further away from the lens, get a clear picture to appear on the wall. As you can see, making a projector at home is very simple. Now you can stock up on cookies and enjoy watching your favorite movie on the big screen.
How to make a high resolution projector
Not everyone can make a high-quality projector with their own hands at home, as it requires certain skills. If you cannot separate the matrix from the light-distributing substrate, do not undertake this task.
You will need:
- 2 Fresnel lenses;
- A good magnifying glass lens;
- A section of sewer pipe of the same diameter as the lens;
- 2 guides with plain bearings;
- Long screw with nut;
- Fastenings for screw and guides;
- 100 watt LED;
- Processor radiator with a power dissipation of at least 100 watts;
- Computer fans 120 and 80 mm;
- Computer power supply 300 watts;
- Boost DC-DC converter 150 watts;
- Two-core cable with a total cross-section of 2 mm²;
- Cheap Chinese tablet or phone with OTG support;
- Tact button;
- Glue B-7000;
- Any thermal paste;
- Hot melt adhesive;
- 4 silicone or rubber feet;
- Sheet plastic that does not transmit light;
- A can of matte black paint;
- 2 furniture hinges;
- Plywood;
- Corners for fastening sheets of plywood;
- A screw from a valve, a wheel from a toy car, or something else that is suitable for the focus knob;
- Self-tapping screws.
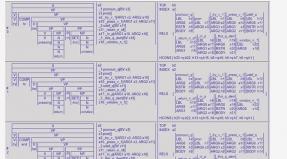
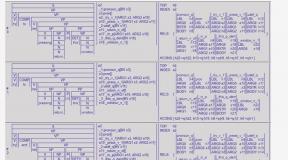
The dimensions of the projector directly depend on the matrix you choose, so when reading the diagrams, be guided by the proportions. If they don't match a little, it's okay. The main thing is that everything works.
Deciphering the designations:
- LCD matrix.
- Fresnel lenses.
- Fresnel lens holders.
- Matrix holder.
- Guide fastenings.
- Screw fastening.
- Guides.
- Screw.
- Sliding bearings.
- Screw.
- Lens carriage.
- Lens holder.
- Lens.
- Focus knob.
- Phone motherboard.
- Display matrix cable.
- Air intakes.
- Loops.
- 120 mm fan.
- Cover border.
- LED
- Radiator.
- 80 mm fan.
- Lens hole.
- USB phone connector.
- Motherboard power cable.
- Power supply and converter.
- Fan power cable.
- Ventilated compartment cover.
- LED power cables.
- Rubber feet.
- Motherboard power button.
To get started, visit a furniture, construction and radio store. There you will find everything you need. When you get home, check if you bought everything. Otherwise, you risk finding yourself in a situation where half the project is ready and then it turns out that some detail is missing. And according to the law of meanness, this will happen at a time when stores are closed.
Manufacturing of individual parts
Decide on the dimensions and cut out the component parts of the body from plywood. There are only 7 of them:
- Base;
- Top;
- Ventilated compartment cover;
- Front and back panels;
- 2 side walls.
Paint the inside of all the pieces matte red. Solder a plate with holes to the nut on which the carriage will be attached. Install one guide mount onto the base and secure it with self-tapping screws. Place the bearing on the guide and insert it into the installed mount. Then place the second fastener on the free end of the guide and screw it to the base. Repeat this operation with the second guide and screw. The screw is installed strictly along the longitudinal axis of the base, and the guides are at the same distance from it.
Cut a carriage out of plywood and secure it to the guides using staples and screws. Do not forget to tighten the nut, without it the carriage will not be able to move. Secure the bearings and nut in the center of the carriage, otherwise it will warp. Cut about 5 cm from the sewer pipe. Insert the lens removed from the magnifying glass into the section and secure it with hot glue. Glue the resulting lens to the carriage with hot glue.
Cut holders for Fresnel lenses from plywood. Make cuts in them in advance for laying the matrix cable and power wires. Place the lenses in the center of the holders and glue them. Cut the holder for the matrix out of plastic, gluing it to plywood is a so-so idea. The cutout in the holder should be slightly smaller than the matrix itself.
Unclip the cover from the phone, remove or disconnect the battery and unscrew all the bolts. Disconnect the display cable from the motherboard and remove it. Unscrew the screws holding the display and remove it from the phone body. If the display is glued with double-sided tape, carefully pry it around the perimeter with a credit card until it comes off. Using your fingernails, carefully separate the light-distributing substrate with LEDs from the matrix. Try not to damage the conductive tracks and cables going to the matrix.
Use a sharp utility knife or scalpel to cut off the separated backing. Coat the edges of the cutout with B-7000 glue and cover it with the matrix. Place a book on the resulting sandwich and wait until the glue dries. To prevent the cable from coming off, glue it to the holder. Fresnel lenses are glued to the holders in the same way.
Solder the wires to the LED and screw it to the radiator, after lubricating it with thermal paste. Insert the radiator with the LED into the cutout on the rear panel and secure it with the corners. Install an 80 mm fan on it and route the wires into the cutout. Make ventilation holes in the side walls and assemble air intakes from plywood. Install a 120 mm fan on the inside of the wall and air intakes on the outside.
The intake holes should face backwards so that the light coming out of them does not hit the screen. Unsolder the standard power button from the motherboard and solder the wires in its place. Also solder wires to the battery connection terminals. Using small screws, secure the board to the side wall. Cut all the necessary holes in the front panel and begin assembling the projector.
Assembly into a single whole
Using corners and self-tapping screws, connect the base to the front and rear panel. Attach the side walls to them. Place the holders with the matrix and lenses in place. The lens closest to the LED should be placed away from the matrix with an interval of two centimeters. This will protect it from unwanted heat. Install the remaining lens tightly.

Solder the clock button to the wires from the motherboard and insert it into the front panel. Fill the button from the inside of the case with hot glue, thereby securely fixing it. Connect the 12 volt line from the power supply to the input of the converter and set it to the LED voltage. Connect the LED power cable to the output of the converter. Connect the wires from the fans to twelve, and from the motherboard to the five-volt line. When connecting all wires, observe polarity. If you confuse the plus with the minus, your motherboard will burn out.
First startup and setup
Insert the cable from the matrix into the motherboard and cover the entire structure with a lid. Place the projector in a dark room, point it at the wall and turn it on. Install the focus knob onto the screw. Rotate it until a clear image appears on the wall. If all else fails, carefully move the holders with lenses and matrix back and forth. After a clear image appears, carefully fix the holders with hot glue. Attach the top to the case and fix the power supply with the converter on it. Replace the hinges and hang the lid on them. Glue the rubber feet to the base and place the finished projector in the place prepared for it.
As it turns out, you can make a projector with your own hands. Moreover, it is of high quality, not inferior to store-bought ones. And the materials spent on its production will cost you much less than a new projector. The only question is whether you have free time and skills. But it rarely happens that a person has no free time at all, and when there is time, skills will appear.
IN lately We often watch our favorite films on the screen of our smartphones. We don't want to search for and download movies to watch on TV. However, there is a simple and inexpensive way to turn your smartphone into a real projector and watch your favorite movies on a large “screen”: a wall or even a ceiling!
In order to make a projector for a smartphone, we need very few things: a strong shoebox or similar, tape, a utility knife and a magnifying glass. I will dwell on the magnifying glass in more detail. It is advisable to find a large Soviet magnifying glass - our grandparents still had such magnifying glasses in abundance. If you are unlucky here, then go to the store: now you can buy relatively inexpensive magnifying glasses of decent quality, just don’t go for outright cheapness.

At the end of the box in the center, carefully mark and carefully cut out a hole for the diameter of the magnifying glass. If the inside of the box is white, then it is best to paint it dark inside or cover it with dark paper.


Now you need to carefully secure the magnifying glass in the resulting hole. Use tape or suitable glue. Work carefully: do not cover the glass with tape or stain it with glue.

Now you need to prepare a place to install the smartphone. Use thick cardboard and tape. Make sure that the angle of the smartphone screen is optimal and that the entire image falls on the lens. Refer to the photo below.

Perform the final installation of the phone according to the following procedure. In a dark room, move the phone inside the box and change the angle until you achieve a sharp, high-quality image on the wall.

All that remains is to make a hole in the box to output the charging wire for the smartphone and close the box.


Important: problems you may encounter when creating a projector:
- poor image quality – try to adjust the position of the smartphone inside the box.
- the projector does not work at all - perhaps you used the wrong magnifying glass, try using a friend.
- the image is upside down - to correctly orient the image, use one of the mobile applications on your smartphone, for example, Ultimate Rotation Control.

- Don’t forget to set the brightness of your smartphone screen to maximum.
- Watch movies using a projector only in a very dark room, otherwise the brightness of the smartphone screen will not be enough.
How to turn a cardboard box into a cheap homemade projector for smartphones.
Smartphones and tablets are great for watching movies and videos when you're away from home, but the screen at home is too small. There are quite a few projectors on the market that work with mobile devices, but they can get expensive.
The good news is that it's quite easy to hack your own projector with items you probably already have. This homemade projector is made from a cardboard shoebox, a magnifying glass, a paper clip, and duct tape. 
Start by tracing the outline of your magnifying glass at one end of the box. Use a knife to cut the line and then make a small hole at the other end for the power cord. 
Next, use electrical tape to secure the magnifying glass to the box. Make sure you get a tight fit so you don't lose any light.
Now take a paperclip and bend it into a small phone stand. Here's the tutorial where they got the idea, for reference. You'll have to experiment a bit to figure out how best to position the stand (this will also depend on the power of your magnifying glass). 
Your projector is now complete. To see the image correctly, as it will appear upside down when passing through the lens, you will need to flip the screen.
On an iPhone, you can do this by selecting " Settings" -> « Basic" -> « Special Features", then switch " Assistive touch" on ON. Click on the small white circle to open the menu, then go to Device -> Rotate Screen .
For Android users, there is no way to make your screen rotate without an app. We suggest using Ultimate Rotation Control, which can be downloaded for free from Google Play, but after the 7-day trial you will have to pay to continue using it. I couldn't find any free alternatives, so if anyone knows of any, be sure to let us know in the comments below. 
To get more detailed information For information on projector assembly and setup, check out the complete Photojojo tutorial. You can also try this other DIY projector created by one of our users here on WonderHowTo.
Need a screen? You can paint one on your wall for less than fifty dollars, or build a more professional-looking screen using a wood frame and some spandex.
Did you know that using an old box and stationery you can build a home projector for your phone with your own hands? This is an easy and fun experiment that you can do at home.
There is a lot of information about this on the Internet, but I put it all together and wrote down the finished instructions.


Step 1: How Smartphone Projectors Work


There are two main types of projectors. All of them come with their own characteristics, strengths and weaknesses, but most work on LCD and DLP technologies. LCD is an older technology, but that doesn't mean it's becoming obsolete. LCD means liquid crystal display. The way it displays the image on the screen is fascinating and not as complicated as you might imagine.
The light bulb is set to transmit fairly powerful light through a prism. The prism breaks the light into its component colors, which are sent through small LCD screens. The screens themselves send signals that travel at specific pixel locations. The light is then projected through the lens onto a screen where the images can be seen by the human eye. DLP, Digital Light Processing, or Digital Light Processing, is a little more complicated.
This time the light passes through a rotating color wheel located on a chip that is equipped with hundreds of thousands of tiny mirrors. The mirrors are turned off or on by electronic impulses according to the need at that moment in time. Although only one color is displayed at a time, the other follows so quickly that the primary colors appear to be mixed to the desired color.
The image appears to be constantly glowing, when in fact small parts of it are constantly flickering. This technology was developed by Texas Instruments and is based on older technology that was used for color television in the 1950s. Knowing the difference between these two types of phone projectors can be important since LCD is considered better for static or high-contrast images. DLP, with its more vibrant colors, is considered more suitable for video.
Some DLP projectors are known to exhibit a rainbow effect. This can happen when white objects move against a dark background, at which time small shadows of red, blue or green can be seen. Most modern DLP projectors have overcome this problem with multiple chips and faster color wheel speeds.
Step 2: Things we will need


Materials:
- Magnifying lens (loupe)
- Foam panel
- Smartphone
- Glue stick
- PVA glue
- shoe box
Tools:
- Hobby knife
- Hot glue gun
- cutting knife
- Hacksaw
- Ruler
Step 3: Cut the handle off the magnifying glass


Carefully cut the handle off the magnifying glass using a hacksaw.
Step 4: Strengthen the box


Strengthen the box by gluing the doors and corners.
Step 5: Let the glue dry


But don’t get carried away too much, a few minutes is enough.
Step 6: Determine the position of the lens

Place the box in a vertical position. Place the lens on top and center it. Using a pencil, trace a circle along the outline of the lens.
Step 7: Cut out an even circle


If you have a compass blade attachment, you can easily cut out a perfect circle, otherwise try to make it as even as possible.
Step 8: Extrude the cut out part


Press down on it. The satisfaction is almost the same as bursting a baby bump.
Step 9: Position the Lens


Before gluing the lens, align it exactly with the hole.
Step 10: Glue the Lens

Step 11: Cut off excess cardboard from the lid


Once you place the lid on the box, it may cover part of the lens (this depends on the size of the box). Take the cut out circle and use it as a template to trace and cut out the desired piece of lid.
Step 12: Build a smartphone stand


Build a stand from foam plastic. Make sure it is perpendicular to its base, otherwise the picture will be distorted.