How to cook condensed milk at home. How long to cook condensed milk in a can and how to do it correctly
There is nothing easier than boiling condensed milk in a jar, and almost everyone knows about this method. But if the delicacy was purchased in draft form or in any other container that is not suitable for prolonged contact with boiling water, this is not a reason to be upset. You can get this boiled condensed milk without a tin shell.
How to cook condensed milk without a can
Recipe for cooking condensed milk in a saucepan
To do this, you will need an aluminum pan into which condensed milk is poured from an existing container. The pan is placed on the fire and the milk is brought to a boil with constant stirring. To do this, you can use either a wooden spatula or a regular spoon. When the condensed milk boils, you need to reduce the heat and cook it until the thickness is as desired. If you do not stir the condensed milk, it can not only burn, but also simply form a not very pleasant hard crust on the walls.
Stainless steel cookware is also suitable for cooking, but you should absolutely not use an enamel pan. In it, the condensed milk will begin to burn at the same time as it boils.
How to cook condensed milk without a can in other ways
To cook condensed milk in the microwave, you will need two containers. The larger size is for water, the smaller one is directly for condensed milk. In the future, the principle of a water bath works: condensed milk is boiled by heating the water surrounding the container. The level must be arranged so that the milk in the container is a couple of centimeters higher than the water in a larger container. If there is too much liquid in it, it will simply be poured into a jar of condensed milk while boiling. The cooking time here largely depends on the power of the microwave and the amount of condensed milk.
The utensils used for this process are those that are suitable for the microwave. These can be glass containers or ceramic
What else should you consider when cooking?
To prevent the dishes from rattling when cooking on the stove, you should place any piece of cloth between the bottom of the water bath and the rest of the container. - Do not cook condensed milk in the microwave for too long. If you continuously monitor the process, then with a standard weight of 400 g it thickens in half an hour. - Determining the readiness of condensed milk prepared at home is quite simple. It should change color from white to soft brown, and the consistency changes from light to fairly viscous. Well-cooked condensed milk can be spread with a knife on bread, and not just used for whipping cream, so the degree of boiling is a purely individual thing. - You can achieve chocolate color and thickness only by using natural milk. If you took milk created on the basis of plant substances, then you should not count on a positive result.
How to cook condensed milk without a can, step-by-step video recipe
We have also prepared a video for you to fully understand the step-by-step cooking process.
Any food prepared at home is always tastier than store-bought, be it desserts or other dishes. Condensed milk made by yourself will also give odds to any similar product from the supermarket. Today we will tell you how to cook condensed milk without a can at home. In the first recipe we will make condensed milk, boiled from scratch in a regular saucepan, and in the second option we will provide a recipe for boiled condensed milk.
When choosing condensed milk in a store, you can spend a lot of time studying the composition of the contents of the cans, comparing ingredients and manufacturers. After all, I want to buy a natural product. But even among the abundance of these goods, it is quite problematic to find a truly high-quality product. Therefore, we suggest that you prepare condensed milk yourself from milk and sugar.
Ingredients
- A liter of full-fat milk (preferably homemade)
- Sugar - 1kg
Preparation
Pour the slightly warmed milk into a saucepan, add sugar and stir with a whisk until completely dissolved. Now let the liquid cook on low gas, remembering to constantly stir with a whisk. Cooking may take a little over an hour, maximum one and a half. Cook until viscous.
You can also make condensed milk in a water bath.
Take one large pan and one smaller one. We pour water into the first one, and put the ingredients for our delicacy into the second one. When the water boils, place a saucepan with the milk mixture on top and cook until thickened. This method is convenient because you do not need to stand at the stove all the time, but only occasionally stir the contents of the pan.
 If you bought condensed milk not in an iron jar, but in bulk and want to make “boiled milk” out of it, but don’t know how, then we will tell you how to cook condensed milk without a jar.
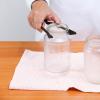
- Pour condensed milk into an aluminum cup (not an enamel cup, otherwise it will burn).
- Place on medium gas and cook, stirring with a wooden spatula.
- When the contents begin to thicken intensively, reduce the heat to low. Now you need to stir continuously.
Cooking time depends on what color and taste you want the product to be. The longer you cook, the darker and thicker the condensed milk becomes.
 If you have a microwave, you can make a “boiler” in it. Pour condensed milk into a cup and place in the oven for 20 minutes, set the power to medium. Every two minutes, remove the cup and stir the contents. If necessary, you can cook a little longer.
As you can see, cooking condensed milk without a can is very simple. We hope that our tips will be useful to you! Bon appetit!
Condensed milk in the oven
You can cook condensed milk without a can in the oven or directly on the stove. To do this, the condensed milk needs to be poured into a glass container, and the container is placed on a heat-resistant glass baking sheet. You need to add water to it, the water level should reach the edges of the jar.
How long does it take to cook condensed milk in a jar until it turns brown? Condensed milk, or condensed milk, is concentrated cow's milk from which the water has been removed, usually with added sugar. This is a sweet, thick product with a caramel flavor; The most common type of packaging is a tin can, which allows condensed milk to be stored without refrigeration for a year before opening.
If you fill a can of condensed milk with water and cook it over low heat, you will get boiled condensed milk. A lesser known name is dulce de leche; literally translates from Spanish as “milk jam.” Today we will talk about how long it takes to cook condensed milk in a jar.
It’s not for nothing that boiled condensed milk is considered a universal product: it is spread on toast, creams for cakes with butter, sour cream or cream are made from it, used for decoration, stuffed, coated with cookies, added to tea or coffee, or eaten just like that.
DoughVed advises. Even the most novice cook can figure out how to cook condensed milk in an iron can at home, but even in such a simple recipe it is necessary to adhere to some key recommendations so that the can of condensed milk does not explode during cooking.
So, there are two basic rules that you must remember every time before you cook condensed milk in a tin can at home.
Rule No. 1: Water must completely cover cans of condensed milk.
There are two reasons to strictly adhere to this recommendation during cooking.
Firstly, water does not physically heat up to more than 100 o C. Accordingly, cans containing condensed milk and completely immersed in water will also not heat up above this temperature. Even if the jars heat up a little more from contact with the bottom of the pan in which they are boiled, the surrounding water will “take” the additional heat onto itself.
However, allowing some of the water to evaporate exposes the jars to open air, causing them to overheat. Due to significant heating, caramelized milk expands and begins to put pressure on the walls of the jar, which may not withstand the pressure and burst.
Secondly, the water in this cooking method actually acts as a water bath. When the jars are completely immersed in water, the caramelization process of the milk is more uniform.
That is why throughout the cooking you need to constantly ensure that there is always enough water in the pan.

Rule #2: Cans must be completely cool before opening them.
In fact, the second rule directly follows from the first: the caramel formed during cooking increases in volume due to heating, so if you open the can immediately, without waiting for it to cool, you can get a whole fountain of scalding hot condensed milk.
To avoid burns, always cool jars to room temperature before opening them.
How long does it take to cook condensed milk in a jar?
10 minutes to prepare
3 hours to prepare
315 kcal per 100 g
Boiled condensed milk at home - how and how long to cook in a tin until brown.
Although the process is quite simple, if you follow all the rules, it takes a lot of time to cook condensed milk in a can until it turns brown, so it is better to cook at least 3-5 cans at once and store them ready.
For more information on how to store iron cans of boiled condensed milk at home, read the tips at the end of the recipe.
Ingredients
- condensed milk in cans;
- water in sufficient quantities.
Preparation
- Prepare the required number of cans of condensed milk. Remove the paper labels from the jars and place them in a pan large enough to hold all the jars in one layer. It is better to stack the jars while lying down, since if you place them standing, they will float during cooking and create noise for three hours. In addition, in this case the layer of water above the jars will be thicker.

- Fill with enough cold water to completely cover the jars. The water level should be at least 2-3 cm higher than the cans, the more the better.

- Place the pan over high heat and bring to a boil. After the water boils, cook for 2.5-3 hours. The boiling should not be too strong - the hotter the water boils, the faster it evaporates. The time depends entirely on how dark brown we want the boiled condensed milk to be. The longer milk is boiled, the darker it becomes. The optimal time is from two and a half to three hours.

- We constantly monitor the water level in the pan, check whether the jars are hidden with water at least every half hour, preferably more often. As the water boils, add boiling water.

- After the required time has passed, carefully, so as not to burn your hands, remove the jars from the pan using tongs or a slotted spoon.

- Place the jars on a towel and leave until completely cool. The jars are very hot, so despite using a towel, you need to place them on a heat-resistant surface.

- It is usually recommended to leave the jars for at least 10-12 hours to allow them to cool completely, but there is a faster way to cool the condensed milk. Drain the hot water from the pan and return the jars to it. Place the pan in the sink and fill with cold water. As the water heats up, change it to cold water until the jars are cold to the touch. Open it carefully, as the caramel in the middle is still quite warm.

- Mix the milk with a spoon directly in the jar and use dulce de leche at your discretion, for making desserts, creams or.

- In principle, it is not necessary to remove the labels, but during boiling they become soggy and small pieces of paper stick to the bottom of the pan and jars, which will be quite difficult to clean after cooking.
- To ensure that you always have boiling water on hand in case the water in the pan suddenly boils over, boil the kettle each time immediately after pouring out the previous portion.
- Unopened jars are stored at room temperature for a very long time; opened jars should be stored in the refrigerator, tightly closed with a lid or cling film, for no more than a month.
Today, store shelves are full of a variety of sweets, but this was not the case before. At the end of the twentieth - beginning of the twenty-first century, Russian residents made many delicacies on their own. This was condensed milk, which is still loved not only by children, but also by adults.
How to cook condensed milk correctly
Boiled condensed milk is prepared in various ways: on the stove, in a slow cooker and even in the microwave. Each of these methods allows you to get a delicious dessert with the right consistency, but requires different amounts of time. All recipes will be presented in the review, but for now, the basic rules on how to cook condensed milk to avoid the jar exploding and get the desired product:
- When cooking on the stove, you need to constantly ensure that the container with the treat is completely immersed in water (this way it will not explode).
- When the time is up, do not immediately remove the container from the water; on the contrary, let it cool while in the liquid.
- If you cook using a microwave, you will have to prepare thick-walled dishes to avoid damage to the container during cooking.
- The thickness and color of the sweet dish depend on the cooking time (a brown and thick dessert will be obtained in three hours, and a pale and liquid one in 60 minutes).
- Cooking to a caramel color will only result in a delicacy that contains milk and sugar (other additives will not give the desired result).
How long to cook condensed milk in a jar
The external indicators of the delicacy are directly related to the time spent on preparation (only a pressure cooker can produce quick results). How to make boiled condensed milk viscous? You’ll have to spend three hours, because that’s how long the sweet dish should be cooked. To obtain a liquid consistency, the microwave timer is set for 60-100 minutes, during which boiled condensed milk is obtained at home.
How to cook condensed milk in a can on the stove
The recipe for making boiled condensed milk over a fire is simple. The following ingredients will be required:
- condensed milk in a tin package, without additives – 1 pc.;
- water - the amount depends on the cooking time.
Step by step guide:
- Buy the right product (examine the composition).
- Place the jar in an iron pan.
- Fill the reservoir with water (cover the can completely).
- Place the pan on an open fire.
- Wait for the water to boil and turn on the timer, continuing to boil (the dessert should cook for 1-3 hours).
- Periodically add boiled water to prevent the jar from exploding.
- After the time has passed, turn off the heat and leave the sweet dish to cool and thicken in the liquid.

Boiled condensed milk in a slow cooker
Another recipe for how to cook condensed milk in a slow cooker. To use it, you need to buy condensed milk without preservatives. Step by step guide:
- Place the tin container in the multicooker pan and add water.
- Turn on the “Stew” mode and leave to cook.
- leave to thicken in the bowl of the device, then take out the jar and enjoy.
Most adults and children are partial to boiled condensed milk. However, the quality of modern products under this name raises concerns - their composition is so questionable. However, this is not a reason to refuse a tasty delicacy, because you can cook it the old fashioned way with your own hands.


Selection of condensed milk
Condensed milk is concentrated cow's milk from which the moisture has been evaporated. To add sweetness to the product, sugar is often added to it, resulting in a white, viscous, but still liquid mass. Like any sweet consistency, it sticks to your hands. High-quality condensed milk is packaged in cans, which increases its shelf life to 12 months. If you cook this product, it acquires a brown tint, a thicker consistency and a pronounced caramel taste. The resulting dish is called dulce de leche, which means “milk jam” in Spanish. However, in our country such a dish is known as boiled condensed milk.
Today, condensed milk is sold in doypack bags, plastic and glass containers. Since cooking is carried out without removing the composition from the container, only tin containers are suitable. You should carefully study the label before purchasing. Only a product designated as “Whole condensed milk with sugar.” If there is another name on the label, even if it is very close in meaning, it will not make boiled condensed milk.

You can get high-quality and tasty caramel mass from the most natural condensed milk, which contains only sugar and milk. If it contains preservatives and flavorings, as well as components starting with “E,” then during the cooking process the product may curl, separate, and behave in an unexpected way. It is worth paying attention to the appearance of the can - it should not have dents, damage, or traces of rust.
Naturally, only hermetically sealed containers are allowed for cooking, and their shelf life must not expire. If you choose the right raw materials and follow the cooking recommendations, you will get aromatic boiled condensed milk, reminiscent of toffee. It is definitely superior in taste and safety to store-bought analogues sold under the same name.


How and how long to cook condensed milk so as not to explode?
Cooking condensed milk takes quite a lot of time. Depending on the chosen method, this takes from 3 to 4 hours, so most housewives prefer to boil several cans at once. After cooling, they are simply put in the refrigerator and opened as needed. Cooking time affects the color, consistency and taste of boiled condensed milk.
If you “cook the jars” for an hour after the liquid boils, the “milk jam” will acquire a yellowish tint. Its consistency and taste will remain almost unchanged.
If you boil the condensed milk for several hours from the moment it boils, it will acquire a pleasant caramel or light brown color and thicken slightly. This mixture is usually used for making fondants and greasing cake layers. If you extend the cooking time by one hour, you will get a thick, rich brown “varenka” with a delicious aroma. You will have to take it out of the jar with a spoon, and the composition will not drain, but will harden into a viscous sweet mass. Finally, if you boil the product for 3.5 hours, it will turn rich brown, and you will have to eat it with a knife. Boiled condensed milk will cut like butter.


In a saucepan on the stove
This method rightfully claims to be a classic, since this is how dulce de leche was prepared in the Soviet period. The process does not require special skills, although “set it on fire and forget it” cannot be said about this recipe, since you need to constantly monitor the water level, adding it if necessary. This method is also attractive because it allows you to cook a lot of condensed milk at the same time. It is enough to take a wide pan and increase the volume of water to accommodate several cans at once.
The pan should be taken with thick walls and bottom. You must first remove the labels from the cans.

It will be possible to prepare a creamy dessert at home from ordinary condensed milk if it is quite fatty. This figure must be at least 8.5%. It is better to stack tins in dishes rather than place them vertically. In this case, they will not float up during the cooking process, and the layer of water above the jars with this arrangement will be larger. And so that the containers do not come into contact with the bottom and do not rattle when rolling over it, it is recommended to first place a piece of natural fabric on the bottom, then jars, and then fill with water. There should be enough of it so that the jars are completely hidden, and a layer of liquid of at least 2–3 cm remains above them, but 5–10 cm is better.
After this, you need to turn on high heat and bring the liquid to a boil. Then the boiling intensity should be reduced and the pan should be left for 2–3.5 hours. This is enough to get “varenka”. If you need a dish of a darker shade with a more viscous and dense consistency, you can boil the composition for up to 4 hours. If necessary, you need to add water so that the jars are never left uncovered with water. To do this, it is better to pour water boiled in a kettle into the pan.
In order not to find yourself in a situation where the boiling water suddenly runs out and the jars are left without a water cover, it is better to boil the kettle regularly.


When the specified time period has passed, the containers with boiled condensed milk are removed from the boiling water using a slotted spoon or culinary tongs and placed on a towel. The jars are hot, so you need to act very carefully and leave them to cool on a heat-resistant surface. The dish is ready (it can be opened and tasted or put in the refrigerator) after the contents are at room temperature. As a rule, this takes a whole day, sometimes a day.
You can speed up the cooling time by placing the hot jars in a pan of cold water. As soon as it warms up, drain the liquid and fill it with a new batch of cold water. Repeat until the jar becomes cold and stops heating the water, but it is better not to rush to open the container, since the condensed milk along the walls has completely cooled down, but inside the jar it is still hot and can “shoot out”.


On the stove you can cook condensed milk not only in an iron factory container, but also in an ordinary glass jar. To do this, you need to pour the product into a jar, put it in a pan and fill it with water. Its amount should match the level of condensed milk in the can. Place the pan on the fire and bring the liquid to a boil, then reduce the heat and simmer the “milk jam” for 3–3.5 minutes. You should not stir it during the cooking process, but you must add water to the pan when it boils. The finished “varenka” should be left in the jar until the water in the pan has cooled.


In a pressure cooker and multicooker
When cooking in a pressure cooker, the same rules are followed - the jars are placed in a container and completely filled with water. Cooking time is a quarter of an hour, after which the jars, covered, are left in the liquid for another 3 hours. After this time, open the pressure cooker, but remove the condensed milk only after it has cooled completely. The dish is prepared in a similar way in a multicooker, but you should select the “Soup” mode.


In the microwave
You can cook condensed milk in the microwave only by opening the can and transferring it to a glass container intended for use in the microwave. Set the power on the unit to 750 W and cook for several minutes. Then take it out and mix. Repeat the process, removing the container of cream and stirring it every 2 minutes. This will prevent the milk from burning and finish cooking when the dish reaches the desired consistency.


Rules
Despite the fact that cooking condensed milk is a fairly simple process, several rules must be followed: otherwise, there is a risk of not only spoiling the “varenka”, but also causing the jar to explode.
- The first rule concerns the amount of water in the pan. It must completely cover the jar. The fact is that the boiling point of water cannot exceed 100ºC, which means that the jar will not heat up to the above limit. Even if this happens due to the contact of the tin with the bottom of the pan, the surrounding liquid will “take” the heat onto itself. If it happens that some part of the container is not under water, this will lead to its overheating. As a result, the temperature of the sweet mass will exceed that outside the jar. This will cause the condensed milk to expand and, as a result, the can to explode.
Important! The liquid acts as a water bath. As you know, cooking food in a water bath ensures even heating and eliminates the risk of burning. With a sufficient amount of water, the caramelization process proceeds uniformly, certain parts of the composition (primarily the condensed milk at the bottom) do not burn.