What corrugated paper is needed for large flowers. How to make large flowers with leaves from crepe paper. How to make tulips from corrugated paper
Interior decoration in a floral style is gaining popularity: giant peonies, roses, sunflowers, poppies are used to decorate wedding celebrations and themed parties, romantic photo sessions and creating unusual store display designs. Even for hats and suits, you can make large flowers with your own hands - it’s no more difficult than assembling a small bouquet or.
Let's talk about materials
When it comes to life-size flowers, you may not immediately believe that this beauty is created from paper. But the corrugated one has unusual properties - in the article on making small flowers we looked at them in detail. Let us remind you that for tall giants, crepe paper with a density of at least 120 g with A and B flute (folds 1.6 and 3.2 mm deep) is most suitable - this will allow the petals to keep their shape.
But! Not all life-size flowers are made from thick corrugated paper. There are models whose petals should bend, curl or fall freely. For these colors, thin paper is used.

To make large flowers, also prepare auxiliary materials and tools:
- thick cardboard for the base;
- scissors or knife for cutting blanks;
- heat gun - large petals are easier to connect with hot glue;
- wire for the stem frame;
- round nose pliers for bending wire;
- fabric, thread, cotton wool for filling the base or for combining materials;
- foam balls or plastic containers as a base.
You will also need: imagination, good mood and a little magic...
Basic techniques and secrets of creating life-size flowers from corrugated paper
The entire decorative effect of the finished product depends on the beauty of the flower head. The process of its formation is similar to making flowers from isolon, but adjusted for the properties of the material. Let's learn how to create big ones!
Accordion method
This funny hat can be made with children - the flower is assembled according to the accordion principle.

We will need several sheets of thin corrugated paper 20–25 cm wide. The length and quantity depend on the desired splendor of the finished flower. Before starting work, the sheets must be placed one on top of the other and the edges aligned.

Stages of work:
- Fold the sheets like an accordion and use scissors to give the edges a semicircular shape.
- Mark the middle of the prepared strip and tie it with thread or clamp it with floral wire, forming a loop for subsequent assembly.
- Disassemble the accordion, smoothing the edges.

- Lift the layers one by one, straightening each sheet.
- When all layers are separated, the flower is ready.
- You can make several flowers and connect them through prepared loops.
The hanging balls from the previous photo were created using this principle. To create such colors, you can combine paper of several colors.
The difference with this design is that the inner part of the flower is cut with fringe separately, and then both parts are combined into a single flower.
And here are more flowers made using the same technique.

Detailed method
You will use this method if you decide to collect giant flowers from corrugated paper with your own hands. To do this, you need to cut out individual petals and leaves using templates. Patterns for large flowers differ from small ones only in size, so you can use the ones we offered in the article.

Since you will need a lot of blanks, it is better to make patterns from thick cardboard or pressboard - this way they will last longer. You can cut the petals with scissors or a stationery knife.
Tip: unroll the roll, fold it several times and then cut it out - you will get several blanks at once.
Next begins the most creative stage in creating a flower - giving shape to the petals. Smooth curves and detailed edge work are achieved by straightening the folds with your hands, stretching the workpiece using a metal ruler or the blunt edge of scissors.
First, use a pencil or stick to curl the edges of the petal, pressing firmly to secure the bend.

The volume is created by straightening the corrugations: slightly stretch them in the upper part of the petal and almost completely straighten the middle.

Finally, you can use the same technique to add wavy edges.
Important! When applying the template to the sheet, you need to make sure that the folds go along the petal - then it can be formed correctly.
This type of MK describes in detail the process of making peony petals:
If you are just learning how to collect large flowers from paper with your own hands, many of the nuances may seem incomprehensible. Let's look at them with an example.

This chrysanthemum is assembled from separate parts, mounted on a branch and placed in a stand made of a flower pot. We'll talk about these assembly details a little later.
For the flower head we will need:
- corrugated paper;
- cardboard circle with a diameter of 30 cm;
- glue gun
Cut out the blanks of petals and leaves according to the pattern, process the edges and give them shape.

You will need at least 30 petals of each size, 6 blanks 20 cm high for the sepals and as many leaves as your imagination and the length of the stem dictate.

Assembly is carried out on a cardboard circle. Let's look at the nuances that make the flower look realistic:
- The petals should be directed strictly to the center, thanks to this we will maintain the symmetry of the flower.
- Filling is carried out in circles, with each subsequent layer shifted towards the center by 1.5 - 2.5 cm. This will ensure a smooth decrease in the diameters of the petals, without the formation of voids. Approximately three rows should be obtained from each type of part. If necessary, you should add these or other blanks.
- The closer to the center, the more the petals should be bent upward, and the smallest ones are bent almost vertically before gluing, thereby filling the middle. This principle is laid down by nature - the petals open from the bud.
After the front part of the flower head is ready, we glue a piece of cardboard tube to the back side, the diameter of which is suitable for the future mount.

The reverse side is decorated with six sepals. They should be glued in a spiral, overlapping the next one, to cover the entire surface of the cardboard base.

Belt method
Flowers made in this way differ little from the previous ones. The whole peculiarity is that the petals are not cut out separately, but are formed on the tape: the profile of the petal is formed in the upper part of the paper strip, and the lower part remains uncut.
Peony made using this technique:
And another fancy flower, reminiscent of a dahlia:
Leaves and stem
If you make life-size flowers with your own hands, you will definitely need a stem and leaves. To realistically reproduce the structure of a leaf, make veins and create a relief:
- lay a wire in the middle of the sheet,
- position the corrugations towards the top of the leaf,
- reproduce the wavy edge.
Watch the video for making leaves for growing flowers:
The next element of a growth flower is the stem. Depending on the purpose, the stem can be made to hold the flower in the hands or as a stand.

In these colors, the stem can be made from a cardboard tube, for example, from foil or cling film, or you can cut a piece of plastic pipe. This leg is multifunctional - such a flower can be placed freely on a stand made of metal rods.
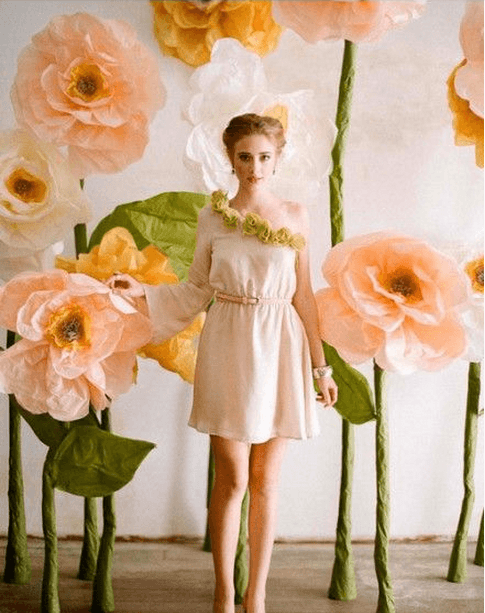
To create spectacular photo zones, a flower on a stem, as in this photo, would be an excellent option:
The stem is made of a wire frame. The secret of its stability is in a plastic cup filled with cement mortar.

Advice. A plastic cup can be replaced with a small flower pot, and cement mortar can be replaced with any building mixture: gypsum, alabaster and the like.
The resulting stand should be wrapped in thick paper, then decorated with green corrugated paper. Using any technology convenient for you, make leaves and screw them to the trunk using wire.
A metal-plastic tube or even a real branch can also serve as a stem - for beauty they need to be decorated with green tape.

The metal-plastic tube securely holds the flower
and looks great in the interior
Stand
Guests of the holiday will be very surprised when they find out that you made life-size flowers from corrugated paper with your own hands. And to decorate everything, you will need a stand. It can be metal, wood or a weighted flower pot.
It is especially important to make a stable stand if you plan to install not just one flower, but a whole branch or a giant bouquet.

For options for making stands for full-sized flowers, see the video:
Important! Take care of stable stands when decorating wedding ceremonies. Flat supports are perfectly camouflaged under a layer of artificial grass.

Compositions of large flowers on the wall
If you do not need a separate flower for a photo shoot, but a whole photo zone, you need to decorate the wall. There is no need for permanent fastening, since the flowers gather dust over time, can accidentally tear, or you simply get tired of them, so you should use simple options:
- Double-sided tape - tapes or ready-made mugs are sold. This method is not suitable for a wall in a room, since marks remain on the surface. The solution is to use a portable smooth plastic surface as a base and lean it against the wall, supporting it so that it does not fall.
- Hooks – ready-made ones with Velcro are available for sale, but you can attach homemade wire hooks to the back surface with hot glue.
- Velcro – ordinary sewing Velcro is used, which is attached to the surface with a construction gun, and to the back of the flower with hot glue. Adhesive-based Velcro is also sold, which is also better reinforced for reliability.
What all these methods have in common is that you need a special surface to mount flowers.

But to create an original design, it is not at all necessary to hang the decor on the wall. You can tie a ribbon on a couple of hooks, to which you can attach flowers and threads with petals, as in this photo:

Or string strings under the ceiling to which you attach the decor, creating a magical atmosphere.

Video with visual examples of attaching paper flowers:
However, large corrugated paper flowers can be used not only for photo zones. They can serve as an amazing costume for theatrical production or a themed party.
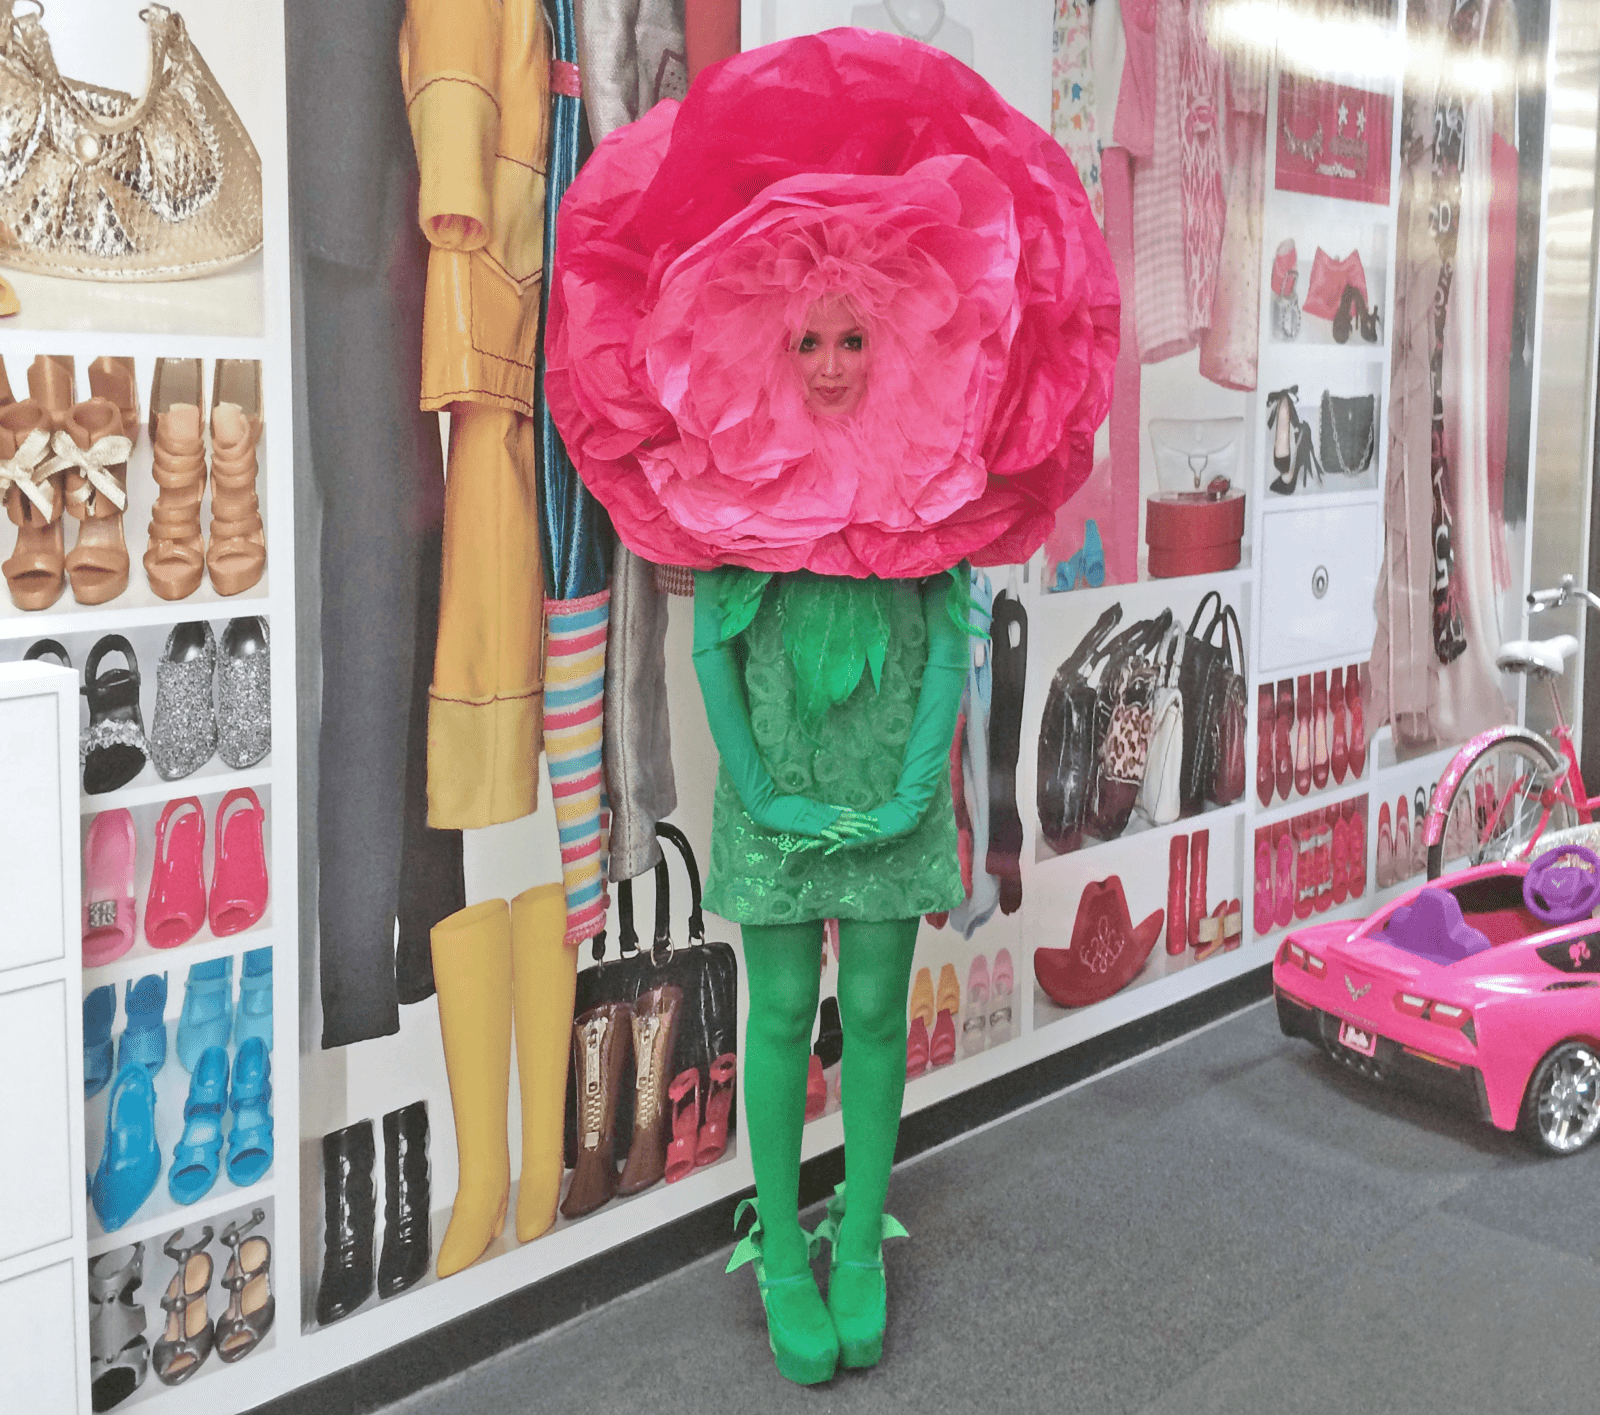

To create these costumes, the designer combined paper with fabric.
Nothing is impossible for limitless imagination! You can even make a chandelier from corrugated paper. The only condition is that there are no problems with the electrical wiring and that the lamps do not come into contact with the flowers.

And this charming cabbage made of corrugated paper will be an excellent setting for a children's photo shoot. It is made according to the principle of flat flowers - on a cardboard base. To make the baby comfortable, there is a pillow in the middle.

There are a lot of ideas for using giant corrugated paper flowers - fantasize, create beauty and delight yourself and those around you with your creativity!
CategoriesYou always want to decorate the most significant day in some special way. Ready-made decorations are quite expensive, and if you decorate a large room with them, it will cost a pretty penny. Today, there are quite a large number of handicraft methods. Flowers can be made using quilling, beading, cold porcelain and even wool felting. But all these options are labor-intensive and require certain technical skills. You can make original flowers from corrugated paper with your own hands in literally 30 minutes. It always looks fresh and creative, plus you can add easy recycling.
Such jewelry has several important advantages that make it a leader:
- minimum amount of money spent on necessary materials;
- flowers can be made so realistic that they are almost impossible to distinguish from real ones;
- the material can be purchased at almost any stationery or craft store;
- extraordinary beauty can be achieved without specialized tools and complex circuits;
- quick disposal is especially important when decorating large halls or rooms;
- will be an excellent gift or decorative element for any celebration;
- This type of decoration can be made even by a child.
Even with all the abundance of DIY methods, flowers made of corrugated paper have been and will be at the peak of popularity. A wonderful way to express yourself and realize your wildest fantasies.

Preparatory work
Before you begin the mystery of flower production, you must first of all equip yourself with all the necessary arsenal in advance. Corrugated paper is best purchased in rolls rather than sheets. The roll contains a large enough footage, which is enough for a whole heap of buds, flowers and petals.
It is recommended to select paper in more natural shades, unless, of course, as planned, the final work should look natural and natural. For buds, leaves and stems, you should take several flowers, in this case, you can play with the shadows. Then the flowers will look more “alive”.

For the stem you need to take a thin pliable wire, a floral sleeve or any other materials.
You will also need thick cardboard for cutting out blanks, glue and sharp scissors. Not necessary, but you can prepare fishing line or strong silk threads and a breadboard knife.
It is best to work in good lighting, this can be either natural light or fluorescent lamps.
Important! If there are small children or animals in the house, it will be safer to work on a high table rather than on the floor.

Flower making process
At the initial stage, many needlewomen are faced with the question: how to make flowers from corrugated paper and where, in fact, you need to start. Of course, each craftswoman has already developed her own technology and some little secrets. However, nothing is impossible for those who want to reach the heights of professionalism.
The most complex technologies always come down to the simplest steps:

The stem, like the flower, should look natural. This can easily be achieved with regular wire and green paper. It is necessary to measure the required piece of wire or floral sleeve and decorate it with prepared corrugated paper, fabric, or even paint it with acrylic paints. Then attach leaves and thorns if the flower implies their presence. The finished flower is “settled” on the stem using glue. Since the wire and the floral sleeve are movable, they can be given absolutely any shape and bend.

How to make realistic peonies.Bystep by step instructions
Peony is a magical flower that is traditionally a symbol of purity and love. A cute bouquet can be an excellent gift for a wedding or birthday of a beloved friend. Peony flowers in nature are quite large in size. For a bouquet of flowers you don’t need to make a large number of heads; 7 pieces will be enough.
If you want to achieve a shade close to the natural color, you can take snow-white or milky paper and give a few strokes of pink, orange or peach acrylic. You can make delicate peony flowers from corrugated paper with your own hands in just 20-30 minutes.
At the first stage, you should carefully cut out rectangles according to the template and slightly round them, thereby giving a natural roundness to the petal.
To make one peony you will need to prepare 10 strips for small petals, 10 strips of wider paper for large petals and several strips of different sizes of green paper for making leaves. To give a realistic shape to the peony, you need to cut the petals slightly oval with a small stem, and the leaves slightly pointed towards the top.
 peonies - process
After all the shapes are cut out, with careful movements the petals need to be slightly stretched in width and height, until the petal is visually closer to the natural one. Next, give the petal a convexity on the outside, thus giving it some volume.
Important! When stretching petals or leaves, you must avoid using nails, otherwise the tenderness and fragility will be spoiled by unwanted lines.
Then the process of “folding” the bud begins. To do this, take several of the smallest petals and wrap one tightly in the other. During wrapping, you must ensure that each subsequent layer overlaps the seam of the previous layer. Thus, gradually, the petals are stacked on top of each other in layers. When the flower has been collected, its base should be secured with thread, fishing line or glue. Since a peony is a carelessly disheveled flower, you can safely tear some of the petals of the finished product slightly and then stretch the edges again.
In total, it will take about 25 petals to make one peony. Sepals are made from green paper. It is necessary to prepare about 10 green leaves, after shaping, wrap them around the finished peony.
To make the flower more voluminous and lush, at the initial stage a round candy or a formed foil ball is placed in the core.
It should be remembered that natural flowers in nature do not have perfectly smooth edges and lines, so the less neatness there is in the bud, the better.

Master classfor making delicate lilies
The royal lily flower is sensuality combined with majesty. Volumetric flowers made of corrugated paper always attract attention. This is not only a good addition to the main gift, but also a great decorative element for any holiday or event.
Using the example below, we will describe step by step how you can make a wonderful lily from ordinary corrugated paper.
To work you will need:
- paper in light lilac, yellow and green shades;
- watercolor, gouache or acrylic paints;
- glue or glue gun;
- wire for the stem, approximately 30 cm;
- brush and sharp scissors.
If the paper is on a roll, then you need to cut a strip 7 centimeters wide from it. From the resulting piece, cut into small rectangular pieces, which should be given a rounded shape to the lily petals. Then, the edges need to be stretched a little with your fingertips, for greater naturalness, and slightly curled with scissors or a regular pencil. Make a depression in the middle of the petal, thus giving it a natural roundness.
When the petals are completely ready, the magical process of transformation begins. To do this, you need to mix brown and dark lilac colors and use the resulting tone to draw natural dots at the base of the petal. For greater naturalness, the dots should be thicker at the base and almost disappear towards the middle.
The stem is made from wire. The required piece of wire is cut and decorated with a thin strip of green corrugated paper. Before wrapping paper around the wire, it is recommended to stretch it properly. This is done to ensure that all unnecessary stripes and folds disappear.

At any edge of the finished stem we make a pistil and form a stigma using hot glue. To be convincing, you should paint this place with green paint.
The stamens are made from yellow paper. A small even square is cut from the roll. We cut strips along its entire length, but leave the base solid. Then you need to twist each strip with twisting movements and treat the tip with a drop of hot-melt glue. After all the work is done, dip the prepared stigmas in semolina, paint with acrylic or gouache in a brown-chocolate shade and let dry.
Lily leaves have a rather elongated shape. You need to cut long rectangular strips of green crepe paper, slightly stretching and folding them. We glue the stamens to the pistil and add three lily petals to the finished structure, placing them slightly above the tips of the anthers.
After this, glue three more petals over the joints of the previous petals and twist the edges of the finished flower again.
The final stage is “installing” the finished lily on the stem, adding petals and securing with drops of glue.

Corrugated flowers with candies
Every needlewoman, having reached a certain level, wants to do something extraordinary and memorable. Not a single holiday or special event is complete without sweets and flowers. Modern craftswomen have decided to combine these two components into one and call this direction suite design.
Flowers made of corrugated paper with candies came into fashion not so long ago, but they have already managed to win over quite a large number of the public with their originality and creativity. Today, through your PC, you can view photos and videos of a huge number of master classes on making an unusual bouquet. A detailed step-by-step description will help you turn all your bold ideas into reality. The main thing is not to be afraid to experiment. Only in this case will you get bouquets that are worthy of decorating not only birthdays, but also weddings.

To make a bouquet you will need chocolates, preferably round and wrapped. This will make the task much easier during the formation of a flower bud. You can take paper of absolutely any color, here you can give free rein to your fantasies. Squares should be cut out of the corrugation, rounded and petals formed by pulling and stretching the finished fabric.
The next step is to cut out squares of baking film. The candy is wrapped around the finished square and a small tail is left at the bottom, which is then wrapped with a beautiful thread or gold-colored ribbon. We gradually “wrap” the finished workpiece, layer by layer, with petals, immediately giving it the shape of a natural flower. You must try to ensure that the first layers completely cover the candy, but the subsequent ones may already be half-open.
A chic bouquet is carefully formed from ready-made flowers. This is done in different ways. You can “plant” each flower separately on a pre-prepared wire; you can use skewers, a foam ball, a plastic bottle or polyurethane foam. After the bouquet has been completed, it can be decorated with satin ribbons, various laces, beads, stones or rhinestones. Such original gift, will definitely leave behind indelible pleasant memories.
To create a spectacular bouquet, you don’t have to stop at just one type of flower. These can be a wide variety of combinations of daisies, roses, daffodils, poppies, tulips, orchids and so on.

Giant size flowers
You can make large flowers from corrugated paper with your own hands for any occasion. Such decoration will always look festive and unusual. Flowers of a delicate shade can decorate a romantic party or wedding celebration. Huge, but at the same time fragile, as if made of porcelain, can add even more atmosphere to the holiday.
For a children's birthday party, products in bright and flashy colors are suitable. Not only will they become indispensable in decorating the festive photo zone, but also photo sessions. Magnificent life-size flowers made of corrugated paper will be able to “greet” guests at the entrance. With such a huge bouquet, you can properly greet your beloved wife from the maternity hospital or give it to your girlfriend.

Step-by-step process for making a large rose:
- on thick cardboard, draw a petal template in the shape of a heart and a drop;
- cut out 15 large hearts and 5 petals in the form of droplets from paper according to the template;
- each cut petal should be well stretched up and to the sides, giving it a natural and natural shape;
- for droplet-shaped petals, you need to beautifully wrap the edges using a pen or pencil;
- For the heart-shaped petals, we make wavy bends using a pencil only on the sides;
- for the stem you will need a piece of ordinary soft wire, which must be decorated with floral tape or green corrugated paper;
- the formation of a bud should begin with small petals, after gluing them to the stem with a drop of glue;
- after the base is formed, first the droplets and then the hearts are glued to it one by one;
- from a long strip of green paper, a sepal is cut into small cloves;
- The finished sepal is fixed around the base of the bud, secured with green adhesive tape or a drop of glue.
At this stage, the rose is completely ready. In order to make leaves, cut out oblong shapes from green corrugated paper. After this, place the edge of the decorated wire in the middle of the finished sheet, after moistening it with glue. Then fold both halves of the sheet so that the wire remains hidden inside the petal, and bend the remaining edges of the paper back.
At the final stage, the leaves are attached to the stem with adhesive tape and decorated with corrugated paper or a few strokes of acrylic paint.

Giant flowers made of corrugated paper can magically turn the most ordinary holiday into an enchanting celebration.
We will send the material to you by e-mail
Decorate your home for the holiday, prepare unusual gifts or decorate a table - all this can be done using corrugated paper. You can make your own flowers from corrugated paper and many other bright decorations. Working with corrugated material will bring pleasure to parents and children.
A bright bouquet will decorate your interior and will never fade
Corrugated material is actively used in different types handicrafts, floristry, applied arts. You can use it to make New Year's garlands, decorative dolls and much more. Children in classes with corrugated materials develop fine motor skills and their own imagination. For an adult, practicing with corrugated paper will help relieve tension and stress.
This ornamental material is available in a wide range of colors and includes both solid-color options and sheets with a soft transition of shades.
From corrugated material you can make:
- inflorescences, natural or fancy;
- paintings with original texture;
- caskets;
- frames and cards;
- decorations on the walls and garlands.

Due to the directional corrugation grooves, the paper holds its shape well and is ideal for gift wrapping and bouquet decoration.
How to make flowers from corrugated paper with your own hands
Made from recycled materials, corrugated paper is nevertheless a completely environmentally friendly material, safe for children and animals. There are many recommendations on how to make flowers from corrugated paper. Below are some tips for creating flower arrangements.
How to make your own roses from corrugated paper step by step
For the rose you will need:
- wire for the stem;
- PVA glue;
- The paper is green, yellow, red or pink.

Sequence of work:
- It is necessary to prepare templates for the petals from thick paper or cardboard.
- From fifteen to twenty-five petals and several leaves are cut out using templates.
- The central part, the bud, is created by tightly twisting the petals and gluing them with glue. For these purposes you will need seven to ten petals.
- The remaining blanks need to be slightly stretched on one edge so that the petal takes on the desired shape.
- The blanks prepared in this way are glued to the main bud.
- All that remains is to cover the wire with green corrugation and secure the leaves.

How to make cloves
Carnation bouquets made of corrugated paper look just like natural ones.

The work will require the same materials as for making a rose.
Sequence of assembling a carnation flower:
- The paper is cut into twelve to twenty squares.
- Four leaves are folded like an accordion and tied in the center with a strong thread.
- The resulting bundle needs to be unfolded, straightening the flower petals.
- Make a few more of these blanks.
- Connect the pieces into one whole. You should get a fluffy flower. It can simply be used as a hanging decoration or attached to a stem to create a bouquet.

Christmas flower
Bright and original poinsettia in Christmas colors is an excellent decoration for the Christmas tree and New Year's table.

Making a flower:
- Bundles are twisted from a strip of corrugated paper and tied in a knot at one end. This will form the stamens for the future inflorescence.
- Petals and leaves are cut out using templates. In poinsettias they have the same pointed shape.
- A small piece of soft wire is glued to each workpiece.
- The flower is collected on the central stem, each tier is secured with a strip of paper and glue. Below there are green leaves, on top there are five red or yellow ones.

Delicate corrugated rosehip
To make an airy rosehip bouquet you will need pink or yellow corrugated paper.

Assembling a rosehip is similar to making a rose:
- Twenty-five to thirty petals are cut out according to the template.
- The petals are glued onto a round cardboard circle, starting from the outer row.
- Stamens made of gold paper are glued into the middle of the rosehip. To do this, the square blank is cut with a fringe and rolled up.
How to make a luxurious peony
Flowers made from corrugated paper with your own hands look like natural ones, and the peony among them is, without a doubt, the king of the bouquet.To make it, it is convenient to use not simple glue, but a glue gun. In addition to the usual set, you will also need double-sided tape.

Sequence of work:
- The paper is cut into twenty-five to thirty squares. Each piece is painted and dried. You can use a hairdryer for drying.
- Petals are cut out from painted blanks.
- Each element of the flower is stretched slightly to give shape.
- There should be stamens in the center of the peony - they are made up of yellow threads.
- A tightly rolled ball of paper is firmly placed on a wire stem wrapped in green corrugation. This is the basis of the future peony.
- The stamens are glued to the center of the flower and the petals are around them. The more petals, the more magnificent the flower will be.
How to make tulips from corrugated paper

To make a tulip, you will first need to make black stamens. Available in craft stores ready-made options. If you cannot find ready-made ones, you can make stamens yourself from such wire, wrapped in light green or black corrugation.
- The stamens are glued to the main stem and wrapped with thread for strength.
- To create the petals, you need to cut rectangular strips about five centimeters long.
- The petals need to be stretched and shaped. The edges of the petals are slightly curled with fingers dipped in water.
- The petals are wound around the stem with thread.
- The sections of petals protruding from below are wrapped with a strip of green corrugation.
Bouquets of flowers made of corrugated paper with sweets
The simplest bouquet with sweets is pineapple. To make it you will need a pot-bellied plastic bottle, round candies in golden candy wrappers, a glue gun and green corrugation.
Pineapple leaves are cut out of corrugated paper - about 5 pieces, maybe more. The leaves are simply inserted into the neck of the bottle, and round candies are glued using a glue gun around the circumference of the vessel.

In another version of making your own flowers from corrugated paper with candies, the sweetness is placed in the center of each flower. This is more painstaking work that requires patience and accuracy. The candy will act as the basis for assembling the petals. But such a bouquet, especially one made with your own hands, will be simply priceless.

Topiary
You can make a topiary from corrugated paper with your own hands.

To work, you will need to purchase a foam ball. Such blanks can be found in craft stores.
Flowers are made using one of the methods described above: roses, carnations, rose hips. Then the inflorescences are glued onto the foam. In the intervals between flowers, you can glue beads or leaves from the same corrugation. The ball is placed on a barrel wrapped in satin ribbon or corrugation. The entire structure is fixed in a flower pot.

- Before making flowers, you need to think through the entire composition and provide the required length of the stems.
- The direction of the corrugation when cutting should go along, and not across the petal.
- You need to stretch the petals as much as possible, so that they can no longer be pulled further. This way they will keep their shape better.

Evgenia Smirnova
To send light into the depths of the human heart - this is the purpose of the artist
Mar 30 2016
Content
The holidays challenge us to make the space beautiful. DIY flowers made from corrugated paper can be a wonderful decoration for any state room. In appearance, these crafts look difficult to perform, especially since from a distance they are confused even with fresh flowers. How to make a flower using corrugation? In fact, the technology is simple; anyone can make a plant. The main thing is to understand the manufacturing sequence; have patience for a monotonous activity, a supply of free time and the necessary material.
How to make flowers from corrugated paper with your own hands
There are many different techniques for making flowers with your own hands: quilling, origami, appliqué, three-dimensional modeling, although the most popular handicraft, due to its simplicity and accessibility, is considered to be creating flowers using corrugation. Crafts and flowers made from corrugated paper with your own hands are considered an exciting hobby and a promising line of work. Anyone can learn how to make original flower arrangements.
Large and voluminous
Unusual voluminous paper flowers are an excellent decor for festive events. You can make your own corrugated flowers in a few hours. Such products can be hung from the ceiling, attached to walls, placed on tables or placed along the edge of a carpet. Scheme for creating homemade large flowers the same as for small flowers. The only difference is the size.

English rose
- We cut the corrugated paper into several strips 6 cm wide. We divide each strip into 10 cm segments, then we form the petals. We round off two corners of the segments.
- The center of the flower can be formed from foil or put candy inside. We attach the core with glue to the end of the stick.
- Take a piece and stretch it in the middle. It should completely envelop the foil ball - you will get the first petal.
- We wrap the stick under the ball with threads, while capturing the petal. It is necessary to wrap each petal tightly 3 times so that our flower does not crumble.
- We form the next petal and secure it on the opposite side of the first leaf. Fix it again with thread.
- Next, we stretch the three petals in the middle and attach them one by one to the bud at an equal distance from each other.
- We stretch four more petals a little and attach them to the bud.
- We form the last petals, like all the previous ones, and their edges must be twisted onto a skewer.
- Distribute six petals evenly. Our fluffy bud is all ready. At the end, secure the thread with glue.
- If desired, delicate corrugated roses can be supplemented with green leaves made of paper.

Giant poppies
Flowers made from corrugated paper with your own hands are perfect for decorating any holiday. So, take a whole roll of paper. Cut it into 6 parts. And then:
- We put the parts one on top of the other, fold them into an accordion 10 cm wide.
- Secure the bottom with thread or a stapler.
- We make rounded cuts along the top of the entire accordion.
- We unfold all the petals in a circle and, separating the layers from each other, add volume to the flower.
- Next, take any scraps and wrap them in black paper so that you end up with a ball.
- We wrap the base with tape - this is the middle of our poppy.
- For a stem, take a thick wire or a wooden strip, wrap it in green paper and make leaves, if desired.
- We will use large vases or special platforms to support the flowers.

On the cardboard we draw a sketch of the template with a pencil: a wavy round shape reminiscent of a cloud. Further actions:
- Cut out the pattern along the contour.
- We attach the template to the corrugated paper and carefully trace its outline with a pencil.
- Cut out the resulting blank. We will need at least 10 blanks for the flower.
- We stack all the blanks on top of each other.
- We make two holes in the center. Next, we pass the wire through one hole, bend its end and thread it through the adjacent puncture.
- Fix the tip of the wire; the result is a blank for the stem.
- Next, take the topmost piece and bend it towards the center. We perform the same action with other blanks.
- The result is a lush peony bud.
- Then we begin to decorate the stem. To do this, take the green stripe crepe paper. Carefully wrap it around the wire.
- Attach the tip of the stamp strip.
- Cut out a few green leaves. They can be made in any form.
- Apply glue to the bottom edge of the stem and attach the leaf. We fix other leaves.

Simple and small
Simple small flowers made from corrugated paper with your own hands are often used in the decoration of beauty salons. Brides love these flowers, so they can be seen in various wedding bouquets. The living room can also be decorated with original artificial paper flowers. The simplest solution is to use them as a substitute for natural plants in pots and vases.
Tulip
- From corrugated red paper, cut out a rectangle 32 cm long and 3 cm wide.
- We fold the resulting segment in half, then again and do this until the width is 4 cm.
- The result should be a paper fan, thanks to which the petals will come out of the same shape.
- Cut out petals from a folded accordion - 8 pieces.
- We crumple the narrow edge of the petal and turn it several times. It will be more convenient to collect them into a bud.
- We bend the wide edge of the petal and carefully stretch the paper.
- We put all the tulip petals together to form a bud.
- We attach the tip of the bud to a wire wrapped in a strip of corrugated green paper.
- We randomly cut out the leaves for the tulip and bend them in half.
- If desired, it is easy to make the middle of the flower with candies, for example, Raffaello.

Irises
- Cut out the stencils. It should be one pointed small petal; one in the form of a drop and a large round one.
- From purple, blue or light blue paper, cut out 3 petals of each shape and carefully stretch their edges.
- To prevent the petals from losing their shape, we glue a thin wire to each of them, leaving tails at the base.
- Apply glue to the center of the large three petals and sprinkle fluff and finely chopped yellow thread on top.
- We assemble the flower: first we connect the small petals together, add the middle ones between them, and attach the large ones at the bottom.
- Wrap the rod with green paper and connect it to the iris flower.

Bouquets and baskets
Flowers made from corrugated paper, which are made by yourself, will look great collected in a bouquet or flower panel. You can pleasantly surprise your family, loved ones, and friends by giving them an original and beautiful basket with flowers and sweets. Their manufacturing technology is simple: the flowers are made of corrugated paper, and sweets are placed in the middle; everything else will depend only on your imagination. A bouquet made of paper, crafts made of corrugated paper - a gift for all occasions!
A basket with tulips is made like this:
- Take any corrugated paper and cut it into strips 15 x 2.5 cm. For leaves 3 x 10 cm.
- We bend the strips in half and turn them over so that the front side faces one way.
- We straighten the segments to give the shape of a petal.
- Each flower consists of six petals.
- Collect all the petals around the skewer. First one petal, then the second.
- We move 90 degrees and put one opposite the other again.
- We straighten the leaves of the resulting flower and twist the base tightly with wire.
- Cut out oblong shaped leaves. We screw them on, stretch them and straighten them.
- We wrap the base of the flower with colored tape.
- We take a basket with filler (you can choose a special filler) and fill it with flowers in a circle. We put a package of truffles in the basket, you can even put a sweet cake or a decorative tree.

But a bouquet of roses is a little more complicated; to create a bouquet you need to take threads; red and white corrugated paper; beads, feathers, rhinestones, etc. So, we make roses from corrugated paper:
- Cut a flat rectangle 15 by 40 cm.
- We bend the edge of the long side of the segment so that we get a wave.
- Roll up the flower and secure the end with thread.
- We make 9 or 12 of these roses – your choice.
- Glue the buds to skewers or to a wire wrapped in green paper.
- We make a bouquet.
- If desired, you can add pearls, dolls, beads or feathers to your handmade composition.
Making flowers from corrugated paper with your own hands is quite difficult, but if you follow the master classes that craftswomen share with each other, you can cope with the task effortlessly. In this review, we will introduce you to this original type of needlework, talk about the intricacies of choosing the ideal materials and share ideas on how to make flowers from corrugated paper and how to incorporate them into the interior.
What is corrugated paper and how is it used in decoration?
If ordinary paper appeared many centuries ago, then its corrugated sister is much younger. It became widespread in the second half of the 19th century in England. At that time, linings for hats were made from thin, soft and pleasant to the touch paper with fine folds.
Corrugated paper flowers for beginners
The simplest buds can be made together with children. They are also suitable for those who are just beginning to master the basics of this skill. You will need:
- corrugated paper (for this type of flowers you can use one colored sheet or several);
- sharp and thin scissors (manicure scissors are suitable);
- toothpick;
- glue;
- cardboard circle.

First of all, you need to cut out 12 circles from paper.
Advice! It will be more convenient to use a cardboard template, a coin or any other flat round object. We begin to attach the finished petals in a circle to a small round piece of cardboard: first we glue five petals on its outer edge, then we glue four more inside and the last three in the center.